Since I started working with Azure Web apps I started thinking: how could we optimize budget spending for PaaS? For VMs it is clear, you stop them. VM v1 requires an additional PowerShell command to deprovision them to stop spending money on them, while VM v2 are deprovisioned automatically on stop. But for or Azure SQL databases and Azure Web apps it was not that straightforward.
So, I took some time to investigate it. The main issue was that I didn’t want to do cumbersome setups like passing resource group names, names of web apps, VMs, SQL databases and their sizes, while keeping track of all changes. Since we are using resource groups to group resources on environment basis, I found out that I could filter all resources from a resource group and find those that could be downsized or deprovisioned (web apps and SQL databases could be downsized, VMs deprovisioned) without hurting the overall application. For example, deleting a Redis cache will require updating the application setup on its recreation.
I feel that using a plain PowerShell script is difficult to share and is just too simple way of solving issues. So I decided to build a VSTS extension for it (TeamCity meta-runner will follow some day too). Check out the result of my Azure Costs Saver extension.
How it works
You can find the core of the extension on my GitHub account
- Downscales App service plans to S0 size with 1 runner. Currently, it doesn’t have a built-in check if a web app has a staging slot, and you cannot downscale to B0 if you have a staging slot. Also, the B-tier has a size limitation of 10 Gb of disk space, while the S-tier allows up to 50 Gb. Before downscaling, the current parameters are saved on the resource as tags.
- Downscales SQL databases to S0 size, saving the current parameters on the SQL server as tags.
- Deprovisions VMs.
When upscaling:
- For Web apps: the tags are read from the App service plan and they are upscaled back to the original sizes and number of workers written in tags.
- For SQL databases: the tags are read from the SQL server and the SQL databases are upscaled back to the required sizes.
- VMs are started again.
How it could be set up
Since running something manually is not the thing I wish to do, let alone several times in a row, I decided to set this up as a VSTS Release; though, the extension could be used in Build as well.
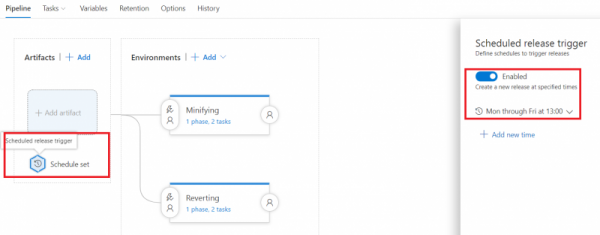
My release is scaling resources up or down in a resource group, corresponding to 2 environments: T (test) and A (acceptance). The release is scheduled to be automatically created at 13:00 each day from Monday till Friday:
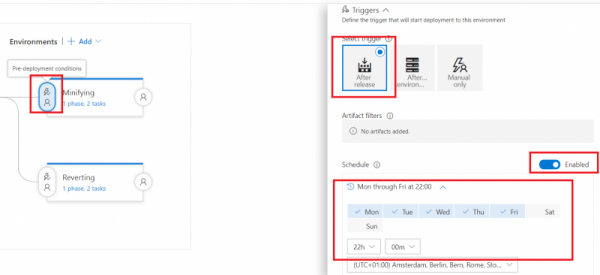
The release consists of 2 environments: one scales down and is called Minifying, which is executed once after release creation at 22:00 from Monday till Friday; the other is called Reverting and is executed once after release creation at 06:00 from Monday till Friday. This setup ensures that at night and during weekends our resources are at minimal size, while during daytime they are executing at full power.
Each VSTS environment consists of 1 phase with 2 tasks to scale up or down resources from the T and A resource groups; each task is an Azure Cost Saver task.
Fields and theirs meaning in task:
- Display name: the name of a task for your convenience
- Azure Connection Type: this allows you to select the connection type, Azure Classic or Azure Resource Manager. By default, you should use the Azure Resource Manager type, but the script is be able to run for Azure Classic
- Azure RM Subscription: a dropdown with subscriptions either accessible to you or configured via VSTS endpoints
- Downscale resources?: a dropdown with a “Yes” and “No” option. If you select “Yes”, the resources will be downscaled and the current sizes (before downscaling) will be written to tags; if you select “No”, the resources will be upscaled to the sizes stored in tags.
- Resource group name: the name of the resource group where the applicable resources are residing.
Conclusion
Using my Azure Costs Saver VSTS extension, you can easily save some costs within your Azure subscriptions for non-production environments, only using the full performance when required – fully automated.


