
Recently, my colleague asked to help him in configuring trust relationship with self-signed certificate on his development laptop. It took decent amount of Googling to find and build this.
Disclaimer
This blog post is work in progress and, eventually, I will update it with better ways for achieving target goal: have trusted by Chrome 58+ self-signed certificate on Windows development laptop for local web server without too much hassle.
Creating self-signed locally trusted certificate for Windows with Powershell
I created powershell script to automate generation of locally trusted self-signed certificate. It will create root certificate, to be used as signing certificate for future generation of other certificates. And this approach could be much easier that openssl one, proposed further.
Please, see script at my repository here . I hope it will help.
After certificates have been generated - you can share them with your developers: export as PFX certificate for your domain, and export as CER file certificate from LocalMachine/Root which is issue to "DONOTTRUST-LocalSigningCertificate". Your fellow developer shall import CER file (certificate without key) to "LocalMachine/Root", PFX - to "LocalMachine/My" and can work with self-signed locally trusted certificate happily (NOTE: you could not use this certificate in open, as it would not be trusted by default - that's only for development purposes to save time and money)
Creating self-signed locally trusted certificate for Windows with openssl in Bash
Despite working most of the time at Windows, I like Linux and, when possible, prefer to use native tools from it, instead ported one's - hence, I have Linux Subsystem for Windows installed and use it a lot of times. In this so-called "guide" I will use native "openssl" from WSL.
Guide
First, we need to generate valid Unix certificate and key. It can be done with following command:
openssl req -x509 -nodes -sha256 -newkey rsa:2048 -keyout localhost.key -out localhost.crt -days 3650 -reqexts SAN -extensions SAN -config <(cat /etc/ssl/openssl.cnf <(printf "\n[SAN]\nsubjectAltName=IP:127.0.0.1,DNS.1:yourHostnameGoesHere"))
This command will produce both certificate (named localhost.crt) for yourHostnameGoesHere and private key (named localhost.key). Answer whatever you wish on questions during generation (on question about Common Name insert your domain name - in our example it is yourHostnameGoesHere)
After that, we need to create a PFX from this (so, certificate can imported at local IIS):
openssl pkcs12 -export -out local.pfx -inkey localhost.key -in localhost.crt
This command will ask you for a password for PFX - enter whatever you wish and memorize it.
Then, go to IIS and import newly created certificate as Server Certificate:
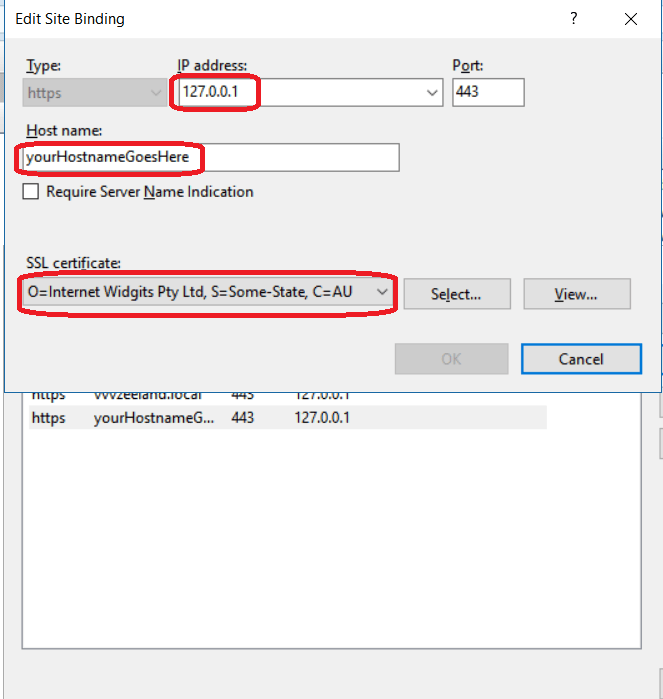
 Now, go to your IIS site and add HTTPS binding for IP 127.0.0.1 and your hostname (do not forget to select imported certificate):
 Modify your hosts file to point yourHostnameGoesHere to 127.0.0.1
Now, you shall trust this certificate, which can be done in following way:
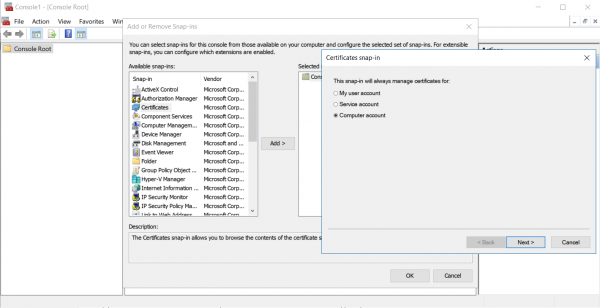
- Launch mmc.exe via Run dialogue
- Go to File -> Add/Remove Snap-in or press Ctrl+M
Select Certificates and manage certificates for Computer account, Next, check to manage Local computer, Finish
- Expand Certificate, expand Trusted Root Certification Authorities, left click Certificates and select All tasks -> Import
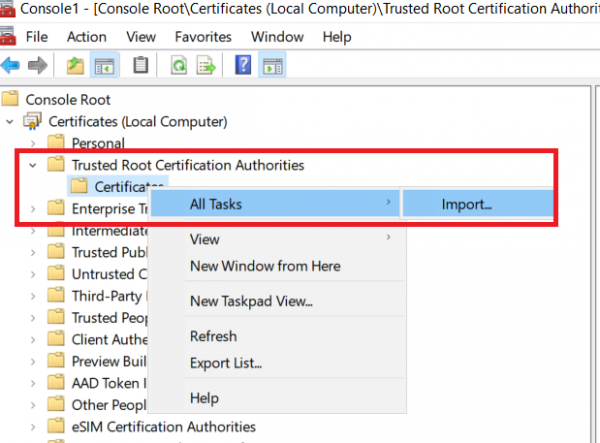
- Browse for recently created PFX and Import it (ensure that you are importing to Trusted Root Certification Authorities)

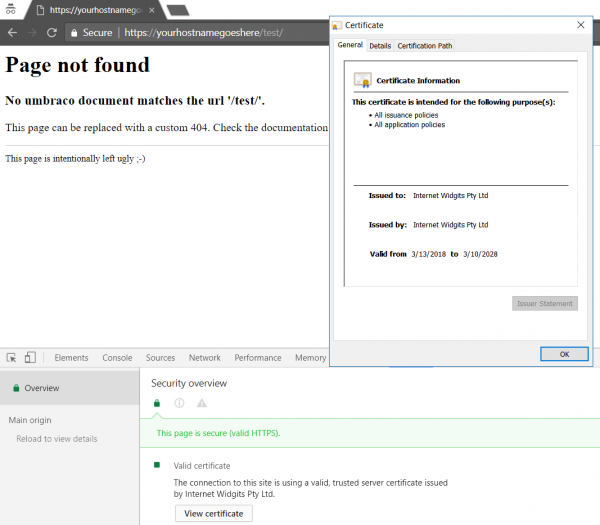
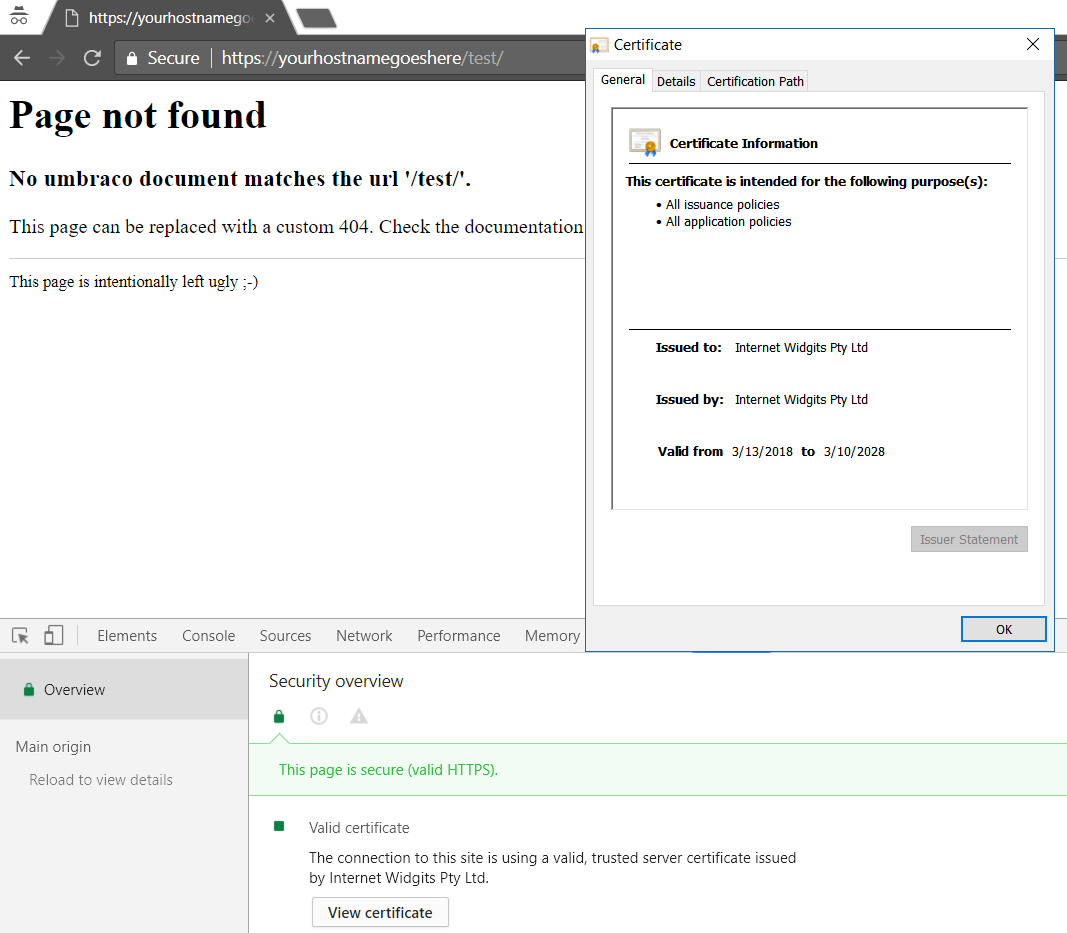
At this point, you shall be able to visit your page and see that you certificate is valid.
If you have multiple sites defined at your IIS - IIS could sometimes serve incorrect certificate. You can stop all sites with following command:
%systemroot%\system32\inetsrv\appcmd.exe list site /xml /state:"$=started" | %systemroot%\system32\inetsrv\appcmd.exe stop site /in
Then, start only the one you configured. If it serves correct certificate, you can start all other IIS sites with command:
%systemroot%\system32\inetsrv\appcmd.exe list site /xml /state:"$=stopped" | %systemroot%\system32\inetsrv\appcmd.exe start site /in